Scheduled Posts
A few months ago, Jeff Hicks asked me to participate in a PSBlogWeek focused on the release of PowerShell 7. I was ecstatic and honored. The contributors were asked to publish one to two blog posts on a specific topic, at a specific time.
A specific time, for my static blog, meant that I needed to push my blog post at or near that time manually. I had no mechanism to schedule a post.
Back then, I did a little searching and found a GitHub Action that seemed like it would do the trick, but I didn’t spend the time to work on it.
In this post, I will show you how easy it is to configure a workflow using Jekyll Publish Drafts to schedule the publishing of a post for a GitHub Pages hosted Jekyll-based site.
Blog Technical Stack
For this blog, I use several free and open-source technologies.
GitHub and GitHub Pages provides source control and serves the static Jekyll site.
When I commit a new blog post, Travis CI picks up the change and builds the site and pushes it into the gh-pages branch.
If you would like to know more, check out my post, How I Blog, on this site.
What’s important for this post is that I did not want to move my site or change the technology stack.
The Jekyll Publish Drafts GitHub Action is the best and simplest solution I found.
GitHub Actions
Originally introduced in 2018, GitHub Actions have evolved to allow users to build end-to-end continuous integration (CI) and continuous deployment (CD) capabilities directly in your repository. GitHub added support for self-hosted runners in November 2019.
They provide a Marketplace with Applications and Actions. Currently it has more than 3500 Actions. Some actions are for those with GitHub Enterprise licensing, while others are offered on a paid basis.
As the time of this writing, the Action Marketplace has 19 Jekyll related actions.
The terms workflow and action are used in this post interchangeably.
Technically, a workflow is essentially a container for one or more actions.
Jekyll Drafts
Jekyll has been around nearly twelve years and, since 2013, supports the generation of markdown files in the site’s _drafts folder using the --drafts command line argument.
You can use this while working on a post to generate the site locally to check how images display, verify links, and check grammar.
The _drafts folder is where you can save your work-in-progress blog posts.
The markdown files in this folder should not be named with the date prefix, like published posts should be.
This is important when we begin scheduling the publication of the drafts.
Jekyll Publish Drafts Workflow
With those quick introductions out of the way, let’s begin setting up the workflow.
Actions Permissions
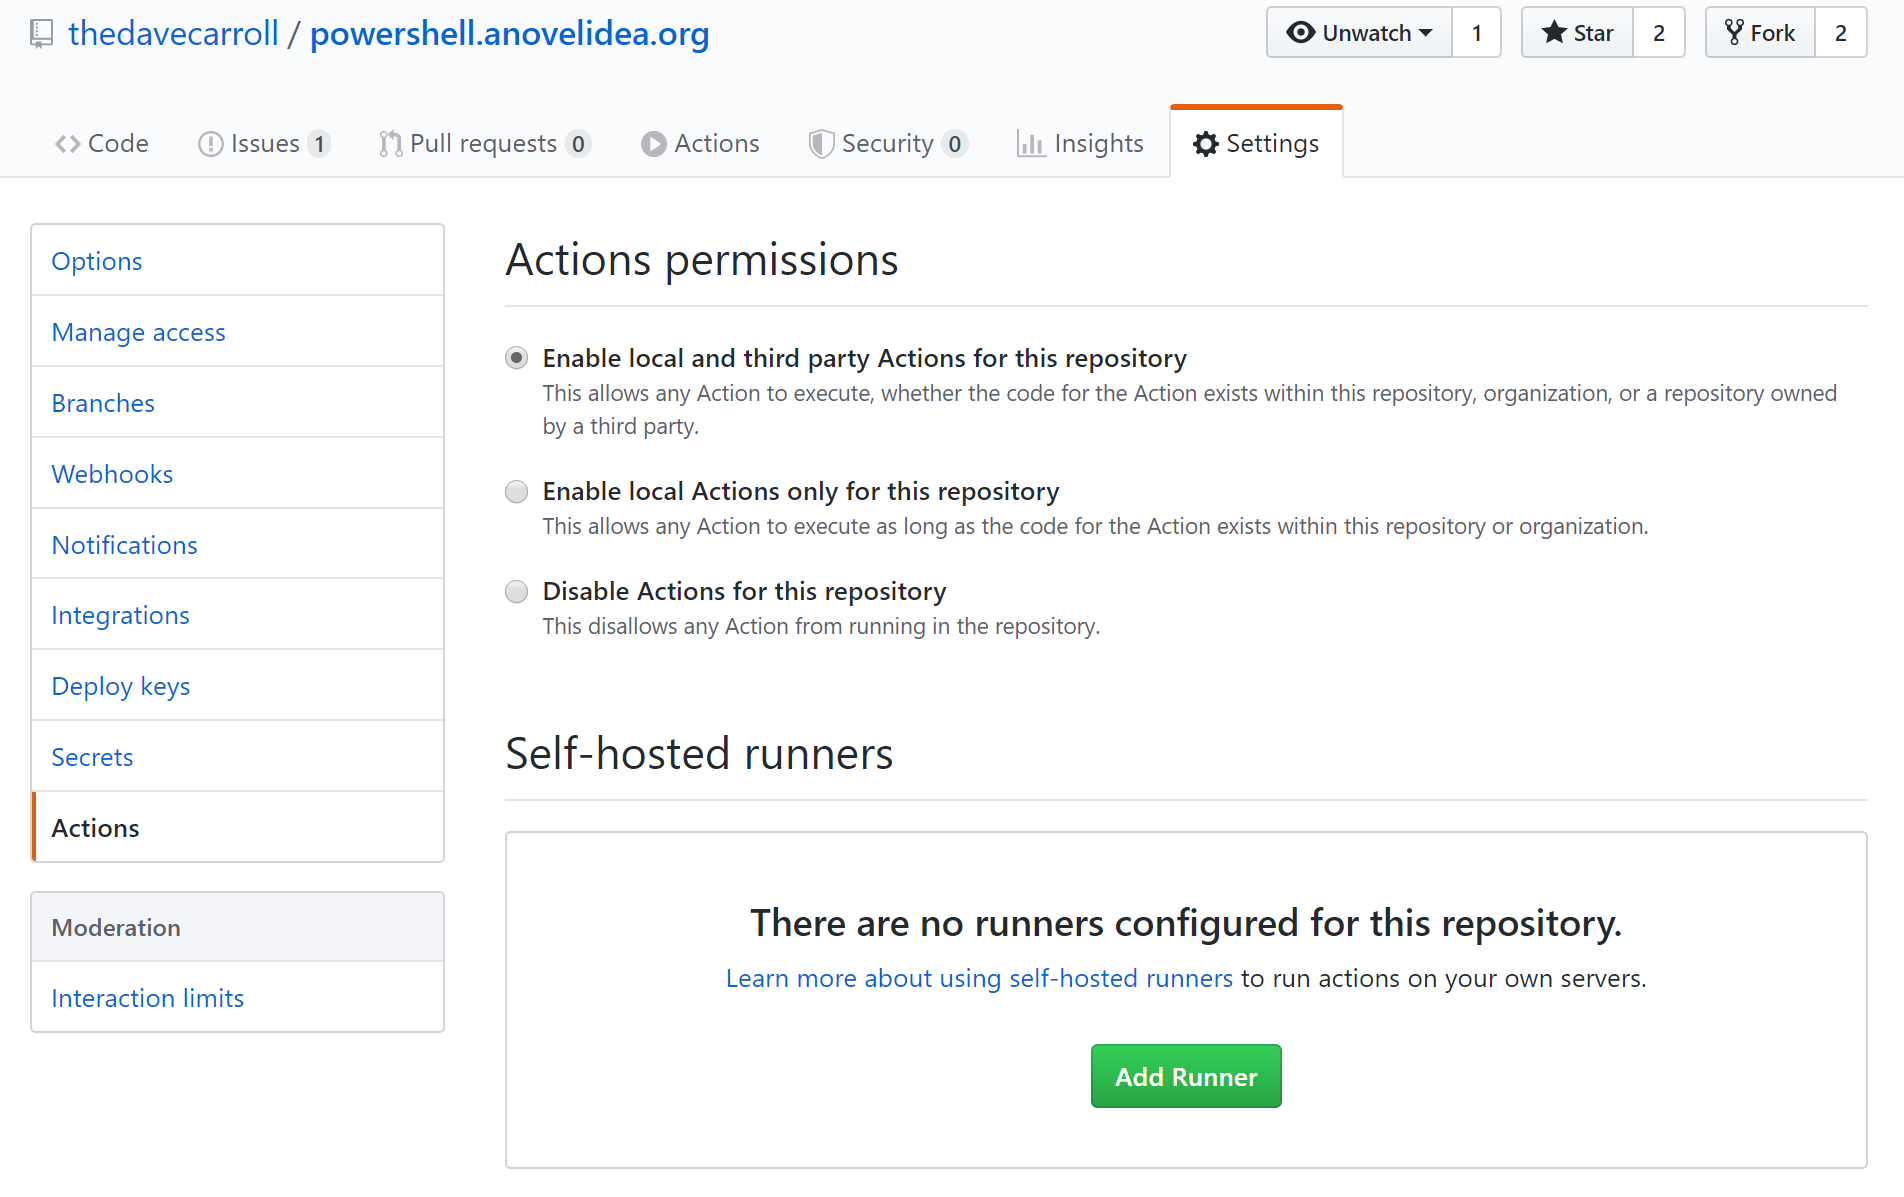
By default, your GitHub repository should allow local and third party Actions. You can check this by going to your repository’s Settings > Actions page.

GitHub Marketplace
Viewing Jekyll Publish Drafts in the Marketplace gives you a green Use latest version button.
This will default to V2 of the action.

Clicking on it will only give you a couple lines that need be included in the workflow yaml file.
Create Workflow File
At the root of your site, you need to create a .github\workflows folder.
In the folder, create a text file with .yml extension.
The name is not significant, but I would suggest using lowercase and avoid spaces.
Here are the contents of my .github\workflows\publish-drafts.yml file.
name: Publish Blog Drafts

on:
  schedule:
    - cron: '30 */4 * * *'

jobs:
  build:
    runs-on: ubuntu-latest

    steps:
    - uses: actions/checkout@v1
    - name: Jekyll Publish Drafts
      uses: soywiz/github-action-jekyll-publish-drafts@v2
      with:
        github_token: ${{ secrets.GITHUB_TOKEN }}
        jekyll_path: ./
        branch: main
Name
The name property is what your workflow will be called and how it will be listed on the Action tab in your site’s repository.
On Schedule Cron
The trigger will for the workflow will be based on the schedule provided in the cron property.
If you’re unfamiliar with Linux/Unix, cron is a task scheduler. The values listed are used to determine when the task, or action in this case, runs.
| minute (0-59) | hour (0-23) | day of month (1-31) | month (1-12) | day of week (0-6) |
|---|---|---|---|---|
| 30 | */4 | * | * | * |
These values will have my workflow run every 4 hours at the half hour mark. I didn’t see the need to run every hour.
- The 30 means at the half hour mark.
- The
*/nmeans to run for everynthinterval of time. In this case, every 4 hours. - The
*means every interval, much like a wildcard. - The day of week (0-6) starts with Saturday and ends with Sunday.
All Workflows
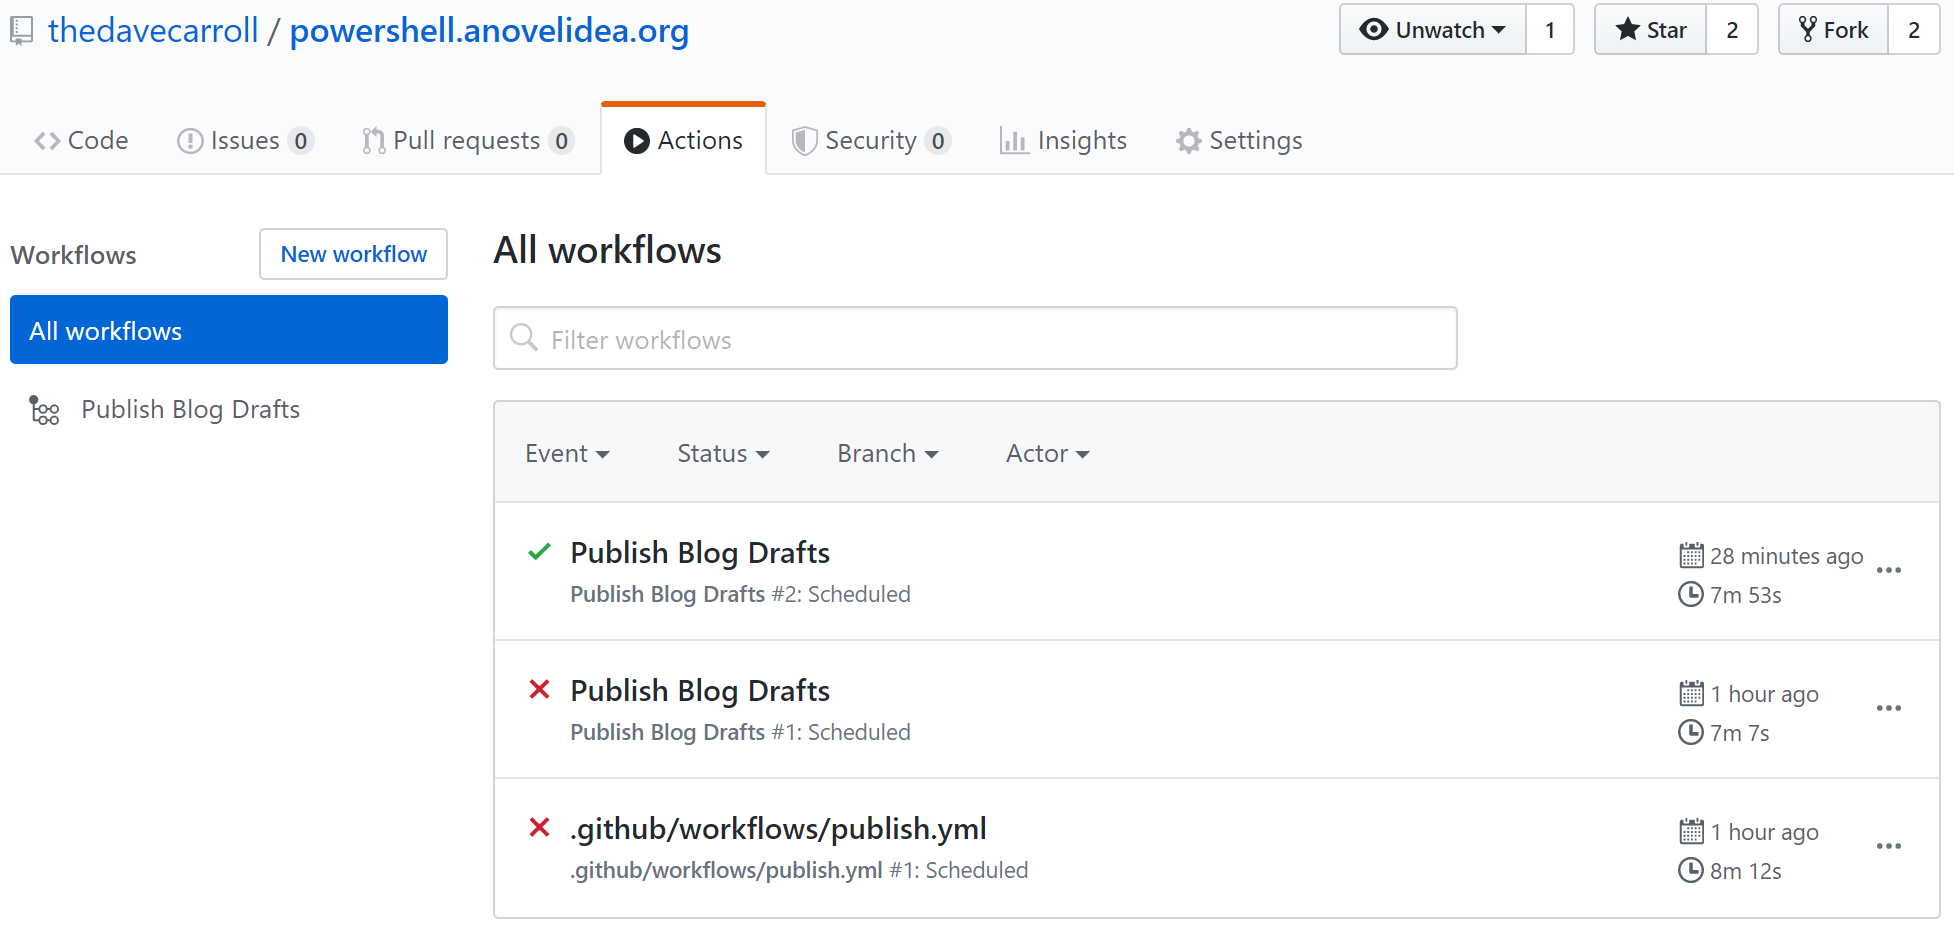
After your workflow has run the first time, you should see it on the Action tab.

You will see that I had a couple failed runs.
I was tinkering with the workflow file and had set jekyll_path incorrectly.
Use the default of ./ as it will be the root of your cloned repo.
NOTE: You will only see your workflow after it has run for the first time. Additionally, at the time of this writing, you cannot remove runs from the list.
Workflow Process
After you have a workflow, let’s examine a few things in the logs.
Still in the Action tab, click on one of the runs then click on build on the left-hand side.

We can see from this there are four main sections for this workflow.
- Set up job
- Run actions/checkout@v1
- Jekyll Publish Drafts
- Complete job
Set Up Job

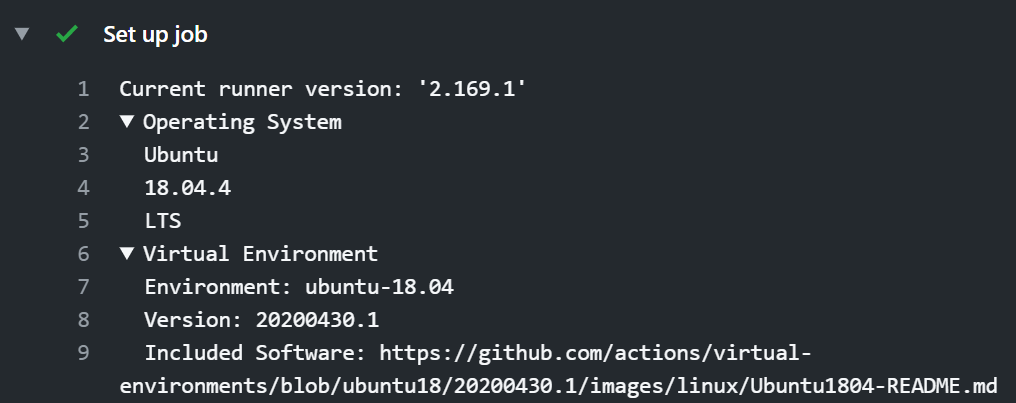
In this section, you will find details on the environment provided. It has interesting information, such as the operating system of the system running the action.
At this time, using ubuntu-latest means that it uses Ubuntu 18.04.4. GitHub even provides a link that defines the software that is included in the build.
Run Actions
The second section is where your Jekyll site repository is synchronized to the running system. It contains the most lines but, ironically, has the least amount of interesting information.
Jekyll Publish Drafts
This section is named the same as the workflow name and contains the results of the action.

For this run, you can see that it found 1 file in my site’s _drafts folder but did not move it to the _posts folder.
Discoveries
This post was published on a schedule using the configured workflow.
Any discoveries that I find after publishing will be added here.
Future Posts
To see a post with a future date in a local development environment, you must use --future command line argument.
I updated my docker-compose.yml* file to include this.
Publish Commit Message
I used [skip ci] in my commit message of the draft and the associated images.
This prevents Travis CI from building the site and pushing into gh-pages branch.
By examining the script.ts TypeScript file in the action’s repository, I noticed that the default commit message is Publish drafts.
I believe if you wanted to change that, you can add the following to the with: section of the workflow yaml file.
      with: # the git_message can be inserted anywhere after with: and must have the same indention
        git_message: "My Custom Commit Message"
Incorrect Filename
From the log files, you can see that the file was incorrectly named with date prefix of 2020-04-11.
2020-05-11T16:32:23.7713614Z Exploring... /home/runner/work/powershell.anovelidea.org/powershell.anovelidea.org/_drafts
2020-05-11T16:32:23.7753285Z /home/runner/work/powershell.anovelidea.org/powershell.anovelidea.org/_drafts/publish-post-jekyll-on-a-schedule.md --> /home/runner/work/powershell.anovelidea.org/powershell.anovelidea.org/_posts/2020-04-11-publish-post-jekyll-on-a-schedule.md
2020-05-11T16:32:23.8181470Z Found 2 files. Moved drafts: 1
This did not alter the publication date which is read from the front matter yaml.
PS> [xml]$sitefeed = (Invoke-WebRequest -Uri https://powershell.anovelidea.org/feed.xml).Content
PS> $sitefeed.feed.entry[0].published

# 2020-05-11T09:00:00-05:00
I manually corrected the name of the file by renaming it after using git pull to synchronize the changes to my local site repository.
NOTE: Since this action commits back to your site repository, it is imperative that you use git pull to synchronize from origin/main to your local copy.
If you modify the markdown file locally before syncing, when you do attempt a git pull,
you will get the following “error: Your local changes to the following files would be overwritten by merge” and it will abort.
At that point, you would have to simply revert the file (losing changes), copy the changes to temporary location, or use git stash to stash changes.
You can then attempt git pull again.
GitHub Action Debug Logs
I found a GitHub ToolKit that discusses how to configure Step Debug and Runner Diagnostic Logs.
Basically, you add a secret to your repository for whichever log you want to enable.
ACTIONS_STEP_DEBUG   true
ACTIONS_RUNNER_DEBUG true
Enabling Step Debug Logs will add debug output prefixed with ##[debug].
Enabling Runner Diagnostic Logs will add additional log files to the log archive that you can download for the run.
Ultimately, enabling both of these logs did not really assist in determining why the file was incorrectly named. I have removed the secrets from my repository just to reduce the clutter in the logs.
Ideas
Adding post scheduling support to my blog site was a learning experience. I’ve writing this post, I have thought of a few things that I could do to make this really shine.
- Add additional logging to the action by way of a pull request (PR).
- Add additional steps to the workflow to automatically send a notice to various social media sites.
- Write my own actions based on PowerShell 7, which is included in the current runner system.
- One to essentially do the same as the the current action, which is based on TypeScript.
- One to send a Tweet.
- Possibly others.
Summary
Thank you for reading this post.
If you found this post because you use GitHub Pages with your Jekyll-based site and would like to schedule the publishing of a post, I hope you found it helpful.
If you have any questions, find errors (technical, grammatical, or typographical), or have suggestions that can make my module better, please leave a comment below.
Thank you, again.
* - Be on the lookup for an upcoming post on how to use a Docker image as a local development system for your Jekyll site.
Reference
Feel free to check out the action’s author’s blog post on using Jekyll Publish Drafts.
Also, if you want want to dig into the action to see how it works, here is the GitHub repo.
Update 2020-06-18 Updated references of master branch to main.

Leave a comment